


The KDS-POTO2 - A DIY Super Plastic Camera

خیلی قبلتر ها می خواستم درباره برش لیزر حرف بزنم. آن زمانی که تبش بود. الان دیگر تب پرینت سه بعدیه و بعدها از اون هم پست هایی خواهیم داشت. اما خب هنوز هم دیر نشده:
هرچند وقت یکبار یک چیز میون گروه های دیزاین و جمع های هنری مد می شه! می نویسم مد چون واقعا مده ؛ گذرا و بی اصالت. جریان های هنری این روزها خیلی زیاد تحت نفوذ و تاثیر تکنولوژی هستند. وقتی برشهای لیزر از دستگاه های غول پیکر و گرون تبدیل به دستگاه های خونهگی و قابل تهیه شدن، ناگهان تب استفاده بهتر و بیشتر از این فناوری خیلی زیاد بین گروه ها شایع شد. دوستانی که دنبال می کنن بلاگهای اهالی دیزاین رو خوب یادشونه اون روزها که تقریبا همه استودیوهای خرد و بزرگ یه دستگاه برش لیزر خریدند و تا چندین پست مدام به معرفی و قابلیت های دستگاه هاشون پرداختند :)) واقعا هم وجود یه دستگاه در کنار آدم که در کسری از ساعت تمام الگوهای مورد نظرت رو با دقت بالا ببره و بیرون بده برای هر طراحی افسونگره! من هم مانند خیلی های دیگه اولین وسیلهی مورد نیاز هر آتلیهی دیزاینی رو -این روزها- بعد از کامپیوتر شخصی، یه دستگاه برش لیزر کوچولو میدونم :).
حقیقت ش اینه که تصورهای کامپیوتری و مدلسازی های سه بعدی هیچ وقت جای ساخت یک به یک و محسوس یک طرح رو نمی گیرن!هیچ وقت
------
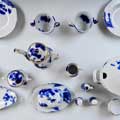
اون روزها یکی از این طراحان برای اثبات قدرت و توانایی روند ساخت لیزر یه دوربین عکاسی کامل رو با برش های متعدد از ورقههای پلاستیک بوسیلهی لیزر ساخت و به نمایش گذاشت:

The Design
If you were not impressed with the La Guillotine DIY camera, we are taking another stub with the KDS-POTO2. KDS-POTO2 is a camera designed and produced by kit da studio – It is quite an awesome camera for a DIY camera, however, one step requires laser cutting. Totally worth it f you ask me.
Here is what this camera is capable of: Itsupports various lenses (yes the very first DIYLR - in this tut: a wide lens scavenged from a Konica WaiWai camera and a pinhole), Interchangeable 120/135 (regular) back, Bulb and normal shutter modes and a frame counter. Yea baby. It is totally DIYed!
In this post, I will show you how to make one of those babies.
To be completely honest, I will not take you through all the design steps, and only give you the final version. This was a second camera in a series so much of the know-how was already accumulated. The goal here was to make it as interchangeable as possible.
If you wanna get a sense of what this camera built like from the inside look at the following drawings:
This is a drawing of the camera internals. Note the little guy working hard on the right hand side.

This tweak give it the option to shoot 135 films

And this one give it the option to shoot 120 films

This is how we make sure the film does not unwind

This is how the interchangeable lens adapter looks like

And this part is the Shell Locker used to hold the film and back in place.

Design
Usually the first thing with this kind of camera is to find the correct distances between the shutter plate, lens and film. (you can see how it is done with a transparency film on theBattlefield Pinhole tutorial.
One of the main challenges was to keep the film from unwinding. Below is a video for the paper model and the acrylic part.
Laser Cut Parts & AI File
During the design phases this was one of the more demanding tasks, luckily for you, you get this file readymade here. This file contains all the parts needed to build the camera (aside the scavenged shutter plate and WaiWai lens) but there are no part numbers or instructions, the design sketch above and the pictures below is all that you have going for you.
The file is an AI 3 file and can be used with any Laser Cutting service like Ponoko, (ponoko compatible file) or with your local laser cutting store. You would need to cut a 3mm black acrylic board.
If you are doing this locally sand the acrylic down on one side so you get one shiny side and one reflective side.
here’s the laser-cut acrylic board with the AI file

Gluing Everything Together
The right glue to use with the acrylic board is Chloroform

Act quickly because it will crystallize

You would need the regular set of assorted tools, like screw drivers, players and so on.

The Film Framework
Here is the framework which holds the film

And here is the frame counter. This is an 8-legged gear so each 8 clicks is one complete rotation and one frame.

Assembled with the top "knob" the knob has a small triangle mark so a full rotation can be easily observed.

The Anti-Roll-Back Gearworks
Here is the spring and leg attached (they are much smaller than what they appear here)

The empty take-up spool

Spring, leg and spool combined to work like the video above.

The entire shell and lens adaptor

And the Holga Shutter plate from behind

The Konica Waiwai Lens
Remove the lens module from waiwai – including the lens holder

Cut up the edges

Use it with the adaptive rings + with the hood stuck to it

The Pinhole “Lens”

Start with a piece of plastic or a part from aluminum can

Sand it till the center part is very thin, and use a sewing pin to punch a hole in it.

Stick the hole on the lens and you are done.

Putting Everything Together

Sample Photo With The Pinhole Lens

Sample Photo With The Waiwai Lens


Some Double Exposures


